이번 시간에는 알카텔 루슨트 백본 스위치인 OS9000 시리즈 패스워드를 잊어버렸을 때 할 수 있는 장비 패스워드 리커버리 하는 방법에 대해서 알아보도록 하겠습니다.
1. OS 9000 패스워드 리커버리 방법 - 물리적 작업-1
알카텔 백본 스위치 같은 경우는 그냥 일반적으로 해서는 U-Boot Mode가 나오지 않습니다. 그래서 CMM에 있는 핀을 물리적으로 두 개를 붙여주어야 하는 불편함이 있습니다.
Booting시 U-boot을 booting하기 위한 “Hit any key to stop autoboot: 0” message가 안 보이는 경우
- 아래와 같은 message는 jumper 설정을 해야 U-booot mode로 booting 가능
CMM Detected
Loading boot.params...
Boot command line disabled.
- CMM을 제거한 다음 Flash memory 아래에 위치한 j5011 jumper에 1-2를 연결
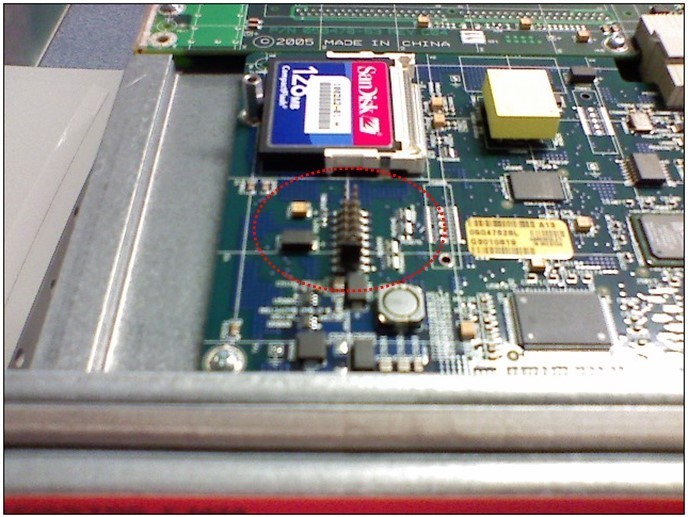
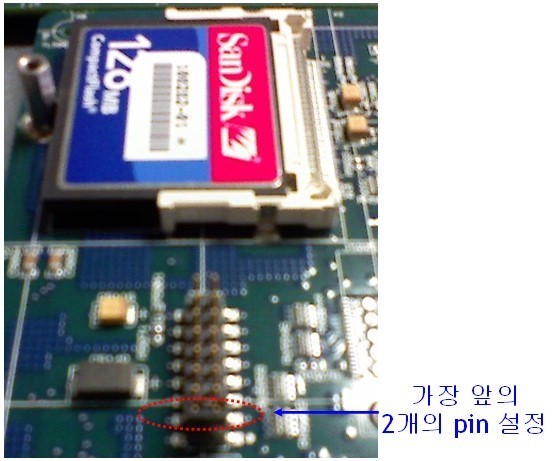
저 동그란 부분앞에 있는 핀 두 개를 펜치로 꽉 붙여주세요. 제대로 붙지 않으면 U-Boot Mode가 나오지 않습니다. 떨지 말고 꽉 눌러주세요. 저도 처음에는 고장 날까 봐. 덜덜 떨면서 했던 기억이..ㅋㅋ
* Backup 계정이 없는 경우 아래의 절차를 따라 Password를 recovery
나머지는 OS6800 시리즈와 똑같습니다.
2. OS 9000 패스워드 리커버리 방법 - 논리적 작업-2
1) Switch에 Console 연결 후 reload 시도
2) 부팅 중 “Hit any key to stop autoboot: 0 “ 에서 Enter 입력
U-Boot 1.1.0(6.1.3.601.R01) (Sep 13 2006 - 14:37:19)
MPC8248 Reset Status: External Soft, External Hard
I2C: ready
DRAM: 256 MB
FLASH: 8 MB
No environment variables found, using defaults
In: serial
Out: serial
Err: serial
No ethernet found.
IDE: Bus 0: OK
Device 0: Model: SanDisk SDCFJ-64 Firm: HDX 4.03 Ser#: 011902G2506J0929
Type: Removable Hard Disk
Capacity: 61.2 MB = 0.0 GB (125440 x 512)
USB: scanning bus for devices...
USB device not responding, giving up (status=80000000)
0 USB Devices found
Hit any key to stop autoboot: 0
3) ==> prompt의 u-boot 상태로 booting
4) “fatls ide :1,0” 의 명령어로 /flash의 file을 조회
=> fatls ide :1,0
FileSize ATTR Filename
---------- ---- ---------------------------------------
0 DIR certified
317 00 boot. params
0 DIR working
11 00 boot. slot. cfg
1985 00 boot. cfg. 1.err
64239 00 swlog1. log
0 DIR network 64000 00 swlog2. log
0 DIR switch
5) “fatls ide :1,0 /network” 의 명령어로 /flash/network directory로 이동
- usertable file을 확인
=> fatls ide :1,0 /network
FileSize ATTR Filename
---------- ---- ---------------------------------------
0 DIR .
0 DIR .
. 23040 00 usertable4
33 00 policy. cfg
404 00 ssh_host_dsa_key
361 00 ssh_host_dsa_key. pub
12 00 lockoutsetting
6) “fatdelete ide :1,0 /network/usertable4” 의 명령어로 usertable file을 삭제
- usertable4가 아닌 경우 usertable로 시작하는 모든 file을 삭제
=> fatdelete ide :1,0 /network/usertable4
Error (no IRQ) dev 0 blk 2097216: status 0x51
Error (no IRQ) dev 0 blk 2097216: status 0x51
Error (no IRQ) dev 0 blk 2097216: status 0x51
Error (no IRQ) dev 0 blk 2097216: status 0x51
Invalid FAT value 0x00000000
Deleted /network/usertable4
7) “fatls ide :1,0 /network” 의 명령어로 usertable file이 삭제되었는지 확인
=> fatls ide :1,0 /network
FileSize ATTR Filename
---------- ---- ---------------------------------------
0 DIR.
0 DIR.
. 33 00 policy. cfg
404 00 ssh_host_dsa_key
361 00 ssh_host_dsa_key. pub
12 00 lockoutsetting
8) run miniboot의 명령어로 reboot을 시도
=> run miniboot
## Booting image at ff900000...
Image Name: miniboot-6.1.3.601.R01
Image Type: PowerPC VxWorks Kernel Image (gzip compressed)
Data Size: 781716 Bytes = 763.4 kB
Load Address: 00005000
Entry Point: 00005000
Verifying Checksum... OK
Uncompressing Kernel Image... OK
9) Booting 완료 후 admin/switch의 default 값으로 login
login : admin
password : switch
Welcome to the Alcatel-Lucent OmniSwitch 9000
Software Version 6.1.5.537.R01 Service Release, November 09, 2017.
Copyright(c), 1994-2017 Alcatel-Lucent. All Rights reserved.
OmniSwitch(TM) is a trademark of Alcatel-Lucent registered
in the United States Patent and Trademark Office.
10) show user의 명령어로 확인하면 default 계정만 남아있는 것을 확인
- admin의 password를 변경 시 password 명령어 입력 후 변경 가능
-> show user
User name = admin,
Password expiration = None,
Read Only for domains = None,
Read/Write for domains = All ,
Snmp allowed = NO
User name = default (*),
Password expiration = None,
Read Only for domains = None,
Read/Write for domains = None,
Snmp allowed = NO,
(*) Note:
The default user is not an active user account.
It constains the default user account settings,
for new user accounts.
11) 만약 snmp를 사용하고 있었다면 community name에 대한 계정을 다시 생성해야 함
- 아래의 snmp 설정 참조
user password-size min 6
aaa authentication snmp "local"
snmp security no security
snmp community map mode enable
user "cobalt" read-write all password "public" no auth
snmp community map "public" user "cobalt" on
snmp station 221.148.52.11 162 "cobalt" v3 enable
snmp trap absorption enable
snmp trap to webview enable
12) 저장 및 동기화 명령어 실행 후 종료
-> write memory
-> copy working certified 또는 copy working certified flash-synchro
OS6850에 비해 조금 어려운 부분이 있긴 합니다.
사용 중에 CMM를 제거해서 , 물리적으로 핀 두 개를 연결시켜야 하는 게 처음 하시는 분들은 어려울 겁니다. 하지만 너무 겁먹지 마시고 , 해보세요
저의 글을 읽어 주셔서 감사합니다. 오늘도 즐거운 하루 보내세요.

댓글